Thursday, 10 March 2016

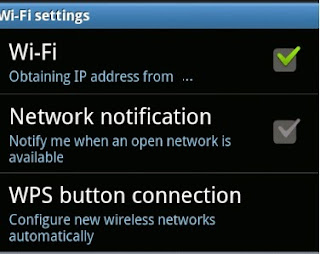
How to Fix stuck at Obtaining IP Address for Android devices

Hey guys!!! If you are unable to connect mobile with WiFi but earlier it was working fine so no worries we are here to help you. Many Android devices get stuck at obtaining IP address loop while trying to connect to WiFi. This is caused by IP address-related issue on your router.
Most users try resetting the router and disconnecting and reconnecting to WiFi but these fixes seldom work, and some even send their Android device for repair, which end up costing them money. Actually, you can fix the obtaining IP address error all by yourself by following the steps below. Please note that this fix is intended for your home network and not for public access points.


How to Fix stuck at Obtaining IP Address for Android devices

Go to system Settings >> Turn WiFi on.
 Long Press on the Wi-Fi network which is causing issue
Now you will get two options in the pop up- “Forget network” and “Modify network”. Choose “modify network”.
 Enable- “Show advanced options” .
Change IP Settings (which is DHCP by default),to “Static”.
Now you should see a bunch of advanced options.
Simply assign a new IP address. For example if it was 192.168.1.3 you can change it to 195.168.1.253. Now “Save”


The above solution is for devices running Android Jelly Bean 4.2.x, 4.3, Android 4.4 KitKat and Android 5 Lollipop. For Older Android OS, the menu navigation is different but the process is basically the same. Just go to Wi-Fi settings, press Menu and choose Advance. Then enable “Static IP” and assign new IP address. Many custom ROMs like Cyanogenmod, Paranoid Android, SlimRom etc also get the obtaining IP address error.

Common devices experiencing this stuck at “Obtaining IP address” issue include almost all the android phones
If it solved your problem then please like our Facebook page
And follow us on twitter by clicking on this link https://twitter.com/Android_Trouble
 If you have any queries do comment below we will try to help you.

How to fix RPC:S-5 error in Google play store (RPC-S:7 RPC-S:3 error Fix)

The  RPC error or RPC:S-5:AEC-0 error is a common error in Google Play Store affecting Android OSs like 4.2 Jellybean or 4.4 KitKat and 5.0 Lollipop. When it occurs, this error users cannot update, download or install any new app or game from the Play Store. Even clearing out the data and cache of the Google Play Store doesn't seem to solve it. [Similar fix to try: How to fix Play Store Error 923]. This is the exact error: Error retrieving information from server. [RPC:S-5:AEC-0] or RPC:S-7:AEC-0  or RPC:S-3:AEC-0 GCF5-ADDI-5UNC.

How to fix RPC error in older Android systems


If you are running older version of Android, then you may have to delete the google account manually to avoid factory resetting. To manually delete gmail account without factory resetting, your device needs to be rooted first. Once its rooted, download a file explorer  like  Root Explorer.


  1. Open Root Explorer
  2.  Navigate to data/ system folder  >>  Delete this file- “accounts.db”. (Note: the System folder is located inside your internal storage and not the external SD Card) 
  3. If you can't find that  file, Go to /data/system/sync and then delete "accounts.xml".
  4.  Now your account is deleted
  5.  Go to Settings >> Accounts >> Add account >> Select "Google" and add your Gmail account back.
  6.  Open Google Play Store and download the app which was Giving you the RPC error. 


How to fix RPC:S-7 [RPC:S-3 & RPC:S-5]  in Google Play Store for Android 


  1. Go to Settings >> Accounts >> Tap on "Google" >> Remove your main Gmail ( Google) account linked with the Play Store (Press menu select "Remove account")
  2. Go back to Settings (optional step)>> Select "Apps" then select "All" tab
  3. Scroll down and select Google Play Store >> Clear data and cache for Google Play Store. 
  4. Again from "All" choose Google Service Framework and Clear Data and Cache. 
  5. Again from "All" choose Download Manager and Clear Data and Cache
  6. Go back to system Settings >> Accounts  >> Tap "Add account" 
  7. Add back your Gmail account. Complete the Google account setups. 
  8. Open Google Play Store and install or update the app/game that was initially giving you RPC error. 


If it solved your problem then please like our Facebook page
And follow us on twitter by clicking on this link https://twitter.com/Android_Trouble
 If you have any queries do comment below we will try to help you.

Life Companion in samsung galaxy S4

If you want to change Life Companion settings in your SAMSUNG S4 but you don't know how to change the settings then we got solution for you.
The screen looks like in Samsung S4 as 


SOLUTION

Go to settings - My Device - Lock Screen - Lock Screen Widgets - Edit Personal Info 

If it solved your problem then please like our Facebook page
And follow us on twitter by clicking on this link https://twitter.com/Android_Trouble
 If you have any queries do comment below we will try to help you.

Monday, 7 March 2016

The application (process com.android.vending) has stopped unexpectedly


There are four methods to resolve this issue. these are :-


Method 1:
  1. Go to settings.
  2. Locate and enter the ‘Apps’ section or the ‘Application Manager’.
  3. Select ‘All’ when presented with the list of applications installed on the device.
  4. Locate the Google Play app and tap on it.
  5. Select ‘Uninstall Updates’.
  6. Run the Google Play Store, allow the application to install updates and the application should then no longer display the “process.com.android.vending has stopped” error.
Method 2:
  1. Remove the device’s SD card to preserve the data stored on it.
  2. Boot the phone up, go to ‘Backup and Restore’ in Settings and perform a full factory reset.
  3. Wait for the phone to be completely reset.
  4. Set the phone up.
  5. Reboot the phone into Recovery Mode and completely wipe the device’s cache.
  6. Open the Play Store.
Method 3 (Exclusive for Rooted Users):
  1. Turn the device off.
  2. Reboot the device into Recovery Mode.
  3. Flash the gapps .zip file all over again.
  4. Boot the device up and the problem should not longer persist.
Method 4 (Exclusive for Rooted Users):
  1. Use the Root Explorer application to gain access to the ‘com.android.vending’ folder in the path ‘Android/data’ or ‘Android/data/data’.
  2. Delete the folder.
  3. Fire up the Play Store to make sure that the issue has indeed been fixed.
If it solved your problem then please like our Facebook page
And follow us on twitter by clicking on this link https://twitter.com/Android_Trouble
 If you have any queries do comment below we will try to help you.

flipkart