Sunday, 13 May 2018


Thursday, 29 September 2016
play store error code 963, 906 & 907
1) Clear Apps Cache:
As Discussed above, your App Cache/data can cause this error too, So to Start with the solutions, let us first try and Clear the Cache of your Apps, Simply Perform Below Steps
- Go to Settings -> Apps ->All
- Select Play Store ->Clear Cache & Data.
- Select the app that was showing the error and Clear cache and data.
That's it, Now try and download the app again and see if the error still persists. If the Caches were the problem, your issue must be solved. If not, Keep reading.
2) Unmounts SD Card:
Unmounting SD Card on your Phone might just help you to get rid of Play store error 963, What we are going to Do is, Unmount SD Card, then Try to Update/Download the app and lastly Re-Mount SD Card.
Simply go to Settings ->Storage -> Unmount SD Card. Now try and download or update the app which was causing problems for you. Once you successfully Download the app without any error, Now its time to Re-Mount SD Card by Navigating to Settings > Storage > Re-mount SD Card.
If the app which is giving you error is in SD Card then you should first try to move it to Internal storage. To do so, Go to Settings -> Apps -> All -:>Select the App -> Move to Internal storage.
3) Downgrade Google play store:
There are chances that the Recent Google play Store update is causing this Error, There are every chances that the Updated Version of Google play store may have compatibility Issues. So in this case you will need to Uninstall the updates of play store.
Go to Settings -> Apps -> Uninstall Play store Updates, Now Try and Download/update the app which was showing the error. This Method should most probably Solve the issue for many.
Just in rare case if none of the above works for you, and if you still get the error on your phone you can try Uninstall the App Completely or Even Uninstall Play Store and then Install it again by downloading from Trusted Sources.
You can even try and remove the email id attached with your Play store account, Reboot your phone and again add the same Id and see if this fixes the issue. But all this only if the main Methods mentioned above fails to work for you.
If you have any queries do comment below we will try to help you.
How to fix screen completely dark on Android Lollipop after setting brightness to zero
First of all don’t freak out because the screen going completely black is a Lollipop bug, meaning it’s just a software glitch and not a serious hardware flaw. So what this bug does is it turns your display completely blank when you set the brightness to its minimum value using the brightness slider in the quick access menu. This mostly occurs only if you have your adaptive brightness enabled on the display settings. Your Android phone or tablet is not screwed it’s just that it’s stuck in 0 brightness setting. This bug has probably been addressed in the latest Lollipop version so you may not get this error if you have the latest Lollipop 5.1.1 version. But if you’ve just experienced this problem try the below methods to turn your display back on- to fix completely dark screen on Android Lollipop after setting the brightness to zero or minimum :

smartphone. For this you will need to download and install or extract the Android SDK Tools for your Windows PC or Mac. Inside the Android SDK tools folder you will find Platform Tools folder where your will have the ADB
If it solved your problem then please like our Facebook page
Method 1: Sliding the brightness level back to full while display is still dark
This method is a guessing game. You won’t see anything on your screen but your screen will still be on so you’ll be able to access the quick settings my swiping down. After which you will have to guess the location of the brightness slider and then start tapping from middle of the screen to the right. If you get it wrong at first, press the sleep button and again turn your screen on and repeat the steps until you get it right. I managed to get the brightness back on in first try.- If you think your screen has gone to sleep. Press the power button.
- Swipe down (this will open the quick settings along with the brightness slider but you won’t see it yet)
- Count three rows down from the top of your screen using your finger tip and slide your finger to the middle of the screen and start tapping to the right. When your finger tip catches the brightness slider, you will get your screen back. The slider is at the middle about 30% below the top of your screen.
- Now Go to Settings -> Display -> Disable “Adaptive brightness”

Method 2: Use ADB for resetting brightness
This method uses the ADB tool of Android SDK to set the brightness level for your tablet orsmartphone. For this you will need to download and install or extract the Android SDK Tools for your Windows PC or Mac. Inside the Android SDK tools folder you will find Platform Tools folder where your will have the ADB
Things you will need to do first:
- Download and install Android SDK Tools where you will find the ADB tool inside Platform folder Make sure USB debugging is turned on by going to Settings. Developer options & Enable “USB debugging”
- Make sure that your Android device’s USB drivers is installed on your PC or Mac
- Simply connect your Android device (USB debugging enabled) to your PC/Mac and it should download the USB drivers automatically from the internet. Or, you can manually download it from your device manufacturer’s website
- If you can’t find developer’s options, go to Settings & About Tablet/Phone, Continuously tap on the Build number till you get a notification saying developer options have been enabled.
- Connect your USB debugging enabled device to your PC/Mac
- Start command line (On windows, press start key and then type “cmd” )
- Inside cmd window, enter the location(directory) where adb.exe is placed a. In Windows cmd, you can enter a folder by typing CD followed by the folder name
- Now run this command to set the new brightness level- adb shell settings put system screen_brightness 200
- Your brightness level should now be set to maximum and your screen should be visible
- Now Go to Settings & Display & Disable “Adaptive brightness”.
If you have any queries do comment below we will try to help you.
Wednesday, 28 September 2016
How to fix Error 919 in Google Play Store Android
This post will try to fix 919 error which occurs while trying to update or install apps or games in the Google Play Store. The exact cause of this error is not known but many associates the error 919 with the Wi-fi connection or Google play cache. Whatsapp, Candy Crush and Clash of Clans are some of the apps and games reporting the unknown error 919. When you update or install such apps from Google Play Store, you will see that the download is already complete but as soon as the installation starts or it says "installing", this error message pops up:
Strangely this error only seem to affect apps or games of certain size. So it could also be related to lack of internal storage. I have got the error 919 while trying to download or update Clash of Clans, Viber, Whatsapp, Facebook etc. If you are trying to update, first uninstall the app and then try to reinstall it. If that didn't work keep reading.
Solution:
Method 1: Clearing cache
Open System Settings.
Select Apps then select "All" tab.
Scroll down and select Google Play Store.
Clear data and cache for Google Play Store Again from "All" choose Google Service Framework and clear data and cache Again from "All" choose Download Manager an clear data and cache Try to install/update the app.
Method 2: Trying different connections
Clear caches as in method 1.
If you are using mobile data please turn it off and turn on Wi-Fi.
Open Google Play Store.
It could also be due to Wi-Fi restriction, try running the updates on a different Wi-Fi connection.
If it solved your problem then please like our Facebook page
 |
| Error 919 on Google Play Store |
Strangely this error only seem to affect apps or games of certain size. So it could also be related to lack of internal storage. I have got the error 919 while trying to download or update Clash of Clans, Viber, Whatsapp, Facebook etc. If you are trying to update, first uninstall the app and then try to reinstall it. If that didn't work keep reading.
Solution:
Method 1: Clearing cache
Clear data and cache for Google Play Store Again from "All" choose Google Service Framework and clear data and cache Again from "All" choose Download Manager an clear data and cache Try to install/update the app.
Method 2: Trying different connections
If you have any queries do comment below we will try to help you.
Monday, 12 September 2016
CONFIGURE OFFICIAL E-MAIL ID
If you want to configure your official Email ID then its different then configuring your Gmail ID, yahoo Id etc. There is few information which you should have before configuring email id:
Prerequisites
Server Name, Server Domain, Incoming Port, Outgoing Port, Security Type, User Id, Password
So to configure your official ID you need to follow these steps:

=>
If it solved your problem then please like our Facebook page
Prerequisites
Server Name, Server Domain, Incoming Port, Outgoing Port, Security Type, User Id, Password
So to configure your official ID you need to follow these steps:
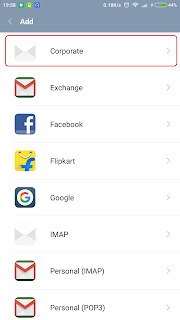
- Go to Settings -> Accounts - > Add account -> Select corporate email or Microsoft Exchange server. exchange(whatever available).
- Enter User Id and Password and go for Manual Setup.
- Fill the form for incoming and outgoing server and finish setup.
- If any "server authentication" error occur then you have to talk to you organization's IT Dept.

=>  =>
=>


If you have any queries do comment below we will try to help you.
How to fix android.process.media has stopped error
If you are getting this error on your screen then this can be resolved using the solutions given below.

SOLUTION
Method 1: Clear date of Media Storage
The data clearing is the most common method used in resolving many types of android error.
- Go to Settings then go to Apps & All.
- Scroll down and select "Media Storage"
- Press "Force close" and select "Clear Data".
- See if the error message stops.
Method 2: Move apps to internal storage or try a different SDCard
This android.process.media has stopped can also be caused if you have recently installed some apps installed inside your SDCard. Move the app to internal storage by going to Settings & Apps & All, Select the app and select "move to internal storage" or "move to phone". See if the problem is resolved. Also try uninstalling and reinstalling the app.
Sometimes the problem can be caused by a faulty sdcard. Check your SDcard for error in your PC. You can use the built-in disc management utility in your PC. If that doesn't solve the error, try a different SDCard.
Method 3: Clear dalvik cache and fix permissions
This is for custom ROM users who have clockworkmod recovery installed in their rooted Android smartphones or tablets.
- Power off device and boot into recovery (press volume + power key).
- Go to advanced & dalvik cache.
- Make the selection and press ok.
- Go back and also select "fix permission" if you have the option.
Method 4: Clear data for Google Service Framework and Google Play
Go to settings & Apps & Swipe left and select "All" tab
Scroll down and select "Google Service Framework" and select "Clear Data"
Again, from "All" scroll down & select "Google Play Store" and select "Clear Data".
Before going to next step make sure you have moved everything from the download folder to a another location or external SDcard.
Again, from "All" >> scroll down and select "Download" or "Download Manager" and "Clear Data".
We hope this resolves your problem, if it does please like Our FACEBOOK page and Twitter Page.

SOLUTION
Method 1: Clear date of Media Storage
The data clearing is the most common method used in resolving many types of android error.
- Go to Settings then go to Apps & All.
- Scroll down and select "Media Storage"
- Press "Force close" and select "Clear Data".
- See if the error message stops.
Method 2: Move apps to internal storage or try a different SDCard
This android.process.media has stopped can also be caused if you have recently installed some apps installed inside your SDCard. Move the app to internal storage by going to Settings & Apps & All, Select the app and select "move to internal storage" or "move to phone". See if the problem is resolved. Also try uninstalling and reinstalling the app.
Sometimes the problem can be caused by a faulty sdcard. Check your SDcard for error in your PC. You can use the built-in disc management utility in your PC. If that doesn't solve the error, try a different SDCard.
Method 3: Clear dalvik cache and fix permissions
This is for custom ROM users who have clockworkmod recovery installed in their rooted Android smartphones or tablets.
- Power off device and boot into recovery (press volume + power key).
- Go to advanced & dalvik cache.
- Make the selection and press ok.
- Go back and also select "fix permission" if you have the option.
Method 4: Clear data for Google Service Framework and Google Play
Go to settings & Apps & Swipe left and select "All" tab
Scroll down and select "Google Service Framework" and select "Clear Data"
Again, from "All" scroll down & select "Google Play Store" and select "Clear Data".
Before going to next step make sure you have moved everything from the download folder to a another location or external SDcard.
Again, from "All" >> scroll down and select "Download" or "Download Manager" and "Clear Data".
We hope this resolves your problem, if it does please like Our FACEBOOK page and Twitter Page.
If you have any queries do comment below we will try to help you.
Touch panel is not responding well for Samsung S6
If the screen becomes unresponsive while using the mobile phone so there might be some problem with the phone. There are so many people who are facing this problem multiple times:
Type *#2663# and black screen will popup
Touch FW update option from menu.
Wait for some time and problem will be solved. Don't Forget to restart the phone.
If it solved your problem then please like our Facebook page and share with your friends
And follow us on twitter by clicking on this link https://twitter.com/Android_Trouble
If you have any queries do comment below we will try to help you.
- The first was when they receives a call, the buttons on the screen does not react to anything. If they try swiping to answer the call first, and then tried to swipe to end it but anything doesn't work.
- When are they are try to set alarm.
- When they try to type any message or write note.
If anybody bought new and expensive phone and these many issues are coming then this phone is not worth it. Right?
But no we got solution for this problem too.
SOLUTION
Open dialer first.Type *#2663# and black screen will popup
Touch FW update option from menu.
Wait for some time and problem will be solved. Don't Forget to restart the phone.
If it solved your problem then please like our Facebook page and share with your friends
If you have any queries do comment below we will try to help you.
Phone is stuck unable to restart phone as battery is Non removable
If your Android phone has Non Removable Battery and it is stuck or you can say its hanged. So with all the phones what we do is that we remove the battery and turn on the phone and problem is solved.
But now the problem is that we can't do that so what is the solution to this problem.
SOLUTION
Press and hold volume down button & power button simultaneously.
Wait for some time you will see your phone turning off.
When your phone restarts well the problem is resolved.
If it solved your problem then please like our Facebook page
But now the problem is that we can't do that so what is the solution to this problem.
SOLUTION
Press and hold volume down button & power button simultaneously.
Wait for some time you will see your phone turning off.
When your phone restarts well the problem is resolved.
If you have any queries do comment below we will try to help you.
Tuesday, 19 April 2016
Activate Developer Option in Android Phone
If your phone settings is not displaying the Developer option and you want to activate this feature. Activating this option is little tricky but its very simple if you need it.
To activate this option you have to follow few steps :

If it solved your problem then please like our Facebook page
To activate this option you have to follow few steps :
- Go to Settings .
- Go to About Device or About Phone(in few phones).
- Now start tapping on BUILD NUMBER unless you get the pop up "You are a Developer Now"
- Now come back to settings you will be able to view Developer option in settings.
If you have any queries do comment below we will try to help you.
Thursday, 10 March 2016
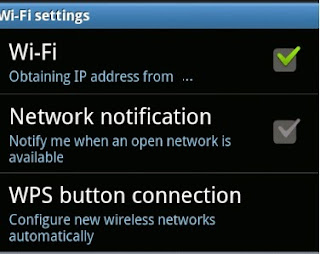
How to Fix stuck at Obtaining IP Address for Android devices
Hey guys!!! If you are unable to connect mobile with WiFi but earlier it was working fine so no worries we are here to help you. Many Android devices get stuck at obtaining IP address loop while trying to connect to WiFi. This is caused by IP address-related issue on your router.
Most users try resetting the router and disconnecting and reconnecting to WiFi but these fixes seldom work, and some even send their Android device for repair, which end up costing them money. Actually, you can fix the obtaining IP address error all by yourself by following the steps below. Please note that this fix is intended for your home network and not for public access points.
Long Press on the Wi-Fi network which is causing issue
Now you will get two options in the pop up- “Forget network” and “Modify network”. Choose “modify network”.
Enable- “Show advanced options” .
Change IP Settings (which is DHCP by default),to “Static”.
Now you should see a bunch of advanced options.
Simply assign a new IP address. For example if it was 192.168.1.3 you can change it to 195.168.1.253. Now “Save”

The above solution is for devices running Android Jelly Bean 4.2.x, 4.3, Android 4.4 KitKat and Android 5 Lollipop. For Older Android OS, the menu navigation is different but the process is basically the same. Just go to Wi-Fi settings, press Menu and choose Advance. Then enable “Static IP” and assign new IP address. Many custom ROMs like Cyanogenmod, Paranoid Android, SlimRom etc also get the obtaining IP address error.
Common devices experiencing this stuck at “Obtaining IP address” issue include almost all the android phones
If it solved your problem then please like our Facebook page
Most users try resetting the router and disconnecting and reconnecting to WiFi but these fixes seldom work, and some even send their Android device for repair, which end up costing them money. Actually, you can fix the obtaining IP address error all by yourself by following the steps below. Please note that this fix is intended for your home network and not for public access points.
How to Fix stuck at Obtaining IP Address for Android devices
Go to system Settings >> Turn WiFi on.Long Press on the Wi-Fi network which is causing issue
Now you will get two options in the pop up- “Forget network” and “Modify network”. Choose “modify network”.
Enable- “Show advanced options” .
Change IP Settings (which is DHCP by default),to “Static”.
Now you should see a bunch of advanced options.
Simply assign a new IP address. For example if it was 192.168.1.3 you can change it to 195.168.1.253. Now “Save”
The above solution is for devices running Android Jelly Bean 4.2.x, 4.3, Android 4.4 KitKat and Android 5 Lollipop. For Older Android OS, the menu navigation is different but the process is basically the same. Just go to Wi-Fi settings, press Menu and choose Advance. Then enable “Static IP” and assign new IP address. Many custom ROMs like Cyanogenmod, Paranoid Android, SlimRom etc also get the obtaining IP address error.
Common devices experiencing this stuck at “Obtaining IP address” issue include almost all the android phones
If you have any queries do comment below we will try to help you.
How to fix RPC:S-5 error in Google play store (RPC-S:7 RPC-S:3 error Fix)
The RPC error or RPC:S-5:AEC-0 error is a common error in Google Play Store affecting Android OSs like 4.2 Jellybean or 4.4 KitKat and 5.0 Lollipop. When it occurs, this error users cannot update, download or install any new app or game from the Play Store. Even clearing out the data and cache of the Google Play Store doesn't seem to solve it. [Similar fix to try: How to fix Play Store Error 923]. This is the exact error: Error retrieving information from server. [RPC:S-5:AEC-0] or RPC:S-7:AEC-0 or RPC:S-3:AEC-0 GCF5-ADDI-5UNC.
If you are running older version of Android, then you may have to delete the google account manually to avoid factory resetting. To manually delete gmail account without factory resetting, your device needs to be rooted first. Once its rooted, download a file explorer like Root Explorer.
If it solved your problem then please like our Facebook page
How to fix RPC error in older Android systems
If you are running older version of Android, then you may have to delete the google account manually to avoid factory resetting. To manually delete gmail account without factory resetting, your device needs to be rooted first. Once its rooted, download a file explorer like Root Explorer.
- Open Root Explorer
- Navigate to data/ system folder >> Delete this file- “accounts.db”. (Note: the System folder is located inside your internal storage and not the external SD Card)
- If you can't find that file, Go to /data/system/sync and then delete "accounts.xml".
- Now your account is deleted
- Go to Settings >> Accounts >> Add account >> Select "Google" and add your Gmail account back.
- Open Google Play Store and download the app which was Giving you the RPC error.
How to fix RPC:S-7 [RPC:S-3 & RPC:S-5] in Google Play Store for Android
- Go to Settings >> Accounts >> Tap on "Google" >> Remove your main Gmail ( Google) account linked with the Play Store (Press menu select "Remove account")
- Go back to Settings (optional step)>> Select "Apps" then select "All" tab
- Scroll down and select Google Play Store >> Clear data and cache for Google Play Store.
- Again from "All" choose Google Service Framework and Clear Data and Cache.
- Again from "All" choose Download Manager and Clear Data and Cache
- Go back to system Settings >> Accounts >> Tap "Add account"
- Add back your Gmail account. Complete the Google account setups.
- Open Google Play Store and install or update the app/game that was initially giving you RPC error.
If you have any queries do comment below we will try to help you.
Life Companion in samsung galaxy S4
If you want to change Life Companion settings in your SAMSUNG S4 but you don't know how to change the settings then we got solution for you.


If it solved your problem then please like our Facebook page
The screen looks like in Samsung S4 as

SOLUTION
Go to settings - My Device - Lock Screen - Lock Screen Widgets - Edit Personal Info


If you have any queries do comment below we will try to help you.
Monday, 7 March 2016
The application (process com.android.vending) has stopped unexpectedly

There are four methods to resolve this issue. these are :-
Method 1:
- Go to settings.
- Locate and enter the ‘Apps’ section or the ‘Application Manager’.
- Select ‘All’ when presented with the list of applications installed on the device.
- Locate the Google Play app and tap on it.
- Select ‘Uninstall Updates’.
- Run the Google Play Store, allow the application to install updates and the application should then no longer display the “process.com.android.vending has stopped” error.
Method 2:
- Remove the device’s SD card to preserve the data stored on it.
- Boot the phone up, go to ‘Backup and Restore’ in Settings and perform a full factory reset.
- Wait for the phone to be completely reset.
- Set the phone up.
- Reboot the phone into Recovery Mode and completely wipe the device’s cache.
- Open the Play Store.
Method 3 (Exclusive for Rooted Users):
- Turn the device off.
- Reboot the device into Recovery Mode.
- Flash the gapps .zip file all over again.
- Boot the device up and the problem should not longer persist.
Method 4 (Exclusive for Rooted Users):
- Use the Root Explorer application to gain access to the ‘com.android.vending’ folder in the path ‘Android/data’ or ‘Android/data/data’.
- Delete the folder.
- Fire up the Play Store to make sure that the issue has indeed been fixed.
If you have any queries do comment below we will try to help you.
Thursday, 25 February 2016
Microsoft apps not opening, Ms excel not working, MS word not working
Sometimes when you are trying open MS APPS in Samsung mobiles but it doesn't open. So there is a very simple solution for such problem.

If it solved your problem then please like our Facebook page

SOLUTION
Go to settings - > Application Manager - > scroll towards right and go to disabled apps - > enable galaxy apps.
Or
Go to settings - > Application Manager - > scroll towards right and go to ALL - > open options - select reset app preferences
If you have any queries do comment below we will try to help you.
Cell Broadcast Info (Displaying Info Of Location)
If there are some location info coming on your phone's screen every now and then so here is solution for you. If you wanna know what is CB messages so you will get this type of messages.


If it solved your problem then please like our Facebook page

SOLUTION
- Open messages - > Option -> Settings - > Cell Broadcast - Remove Tick.


If you have any queries do comment below we will try to help you.
Wednesday, 24 February 2016
Disable Reactivation Lock
There is a feature in Samsung phone that is Reactivation Lock so if you want to enable this feature you need to have Samsung Account. So whats this lock?
Reactivation lock lets you use your Samsung account to prevent others from activating your device if it's ever lost or stolen. With Reactivation lock turned on, you will be required to enter your Samsung account credentials prior to performing a factory reset on the device, so your Samsung account login should be something you can easily remember . So if you activate this lock you won't be able to deactivate it very easily. So here is a solution for you.

If it solved your problem then please like our Facebook page
Reactivation lock lets you use your Samsung account to prevent others from activating your device if it's ever lost or stolen. With Reactivation lock turned on, you will be required to enter your Samsung account credentials prior to performing a factory reset on the device, so your Samsung account login should be something you can easily remember . So if you activate this lock you won't be able to deactivate it very easily. So here is a solution for you.
SOLUTION:
- Entirely delete your Samsung account from → account.samsung.com.
- Factory reset your device.
- Now re-create a Samsung account with the same email ID and credentials as used previously.
- After factory reset, when your phone asks for a Samsung account, login using the re-created account.
- Go to Settings » Lock screen and security » Find My Mobile » and turn off the reactivation lock toggle. It’ll definitely turn off.

If you have any queries do comment below we will try to help you.
Facebook App creating problem
Here are 3 Reasons you should Uninstall Facebook Now And live happily
The Facebook app for Android has become a monster piece of software over the years. It’s clear that as manufacturers improve phone hardware, Facebook increases the power of its mobile app to squeeze more performance out of it. After deleting the app and living a happy life without it, I’d like to present three reasons you should uninstall Facebook now
There is also the issue of battery life. Powering such a resource-intensive app requires a fair chunk of power, so you’re likely to see a tangible difference in how long your phone lasts on a single charge with and without Facebook installed.
Facebook is an essential app for many Android users, so the tax on system and battery performance might be a compromise that many of you are willing to make. But for other Facebookers, this might be more compromise than they want.
Use Facebook mobile. In other words, Facebook in Google Chrome. There are some neat things about it. Firstly, on signing into Facebook, Chrome will ask if you want to receive push notifications directly from Facebook. If you opt-in to this, you’ll be kept updated even when you aren’t using the browser.
The design of Facebook mobile is also pretty slick. It loads at similar speeds to the app, the design is similar as well, plus videos don’t autoplay (if this is something you aren’t a fan of).
But bear in mind that some features are missing if you use Facebook in a browser. This includes Instant Articles and auto-liking posts right from the notification shade. For that, you’ll need to keep the app.
I deleted the Facebook for Android app a while ago and haven’t regretted it. I’ve used Facebook in Chrome ever since and, during my testing, phone performance and battery life improved noticeably. I also lived without notifications for a time and, I have to say, it was quite nice to have a break from all the buzzing my phone used to do.
My usual daily driver is a Moto X (2nd Gen) and this phone has a relatively small battery. If your phone has a small or old battery, then you might see immediate results after uninstalling Facebook.
And hey, you could always reinstall again if you miss it.
Would you try living life without the Facebook app? If you have, did it make a difference to performance? Tell us about it in the comments.
If it solved your problem then please like our Facebook page
The Facebook app for Android has become a monster piece of software over the years. It’s clear that as manufacturers improve phone hardware, Facebook increases the power of its mobile app to squeeze more performance out of it. After deleting the app and living a happy life without it, I’d like to present three reasons you should uninstall Facebook now
1. It drains resources
Facebook has been a large, resource-draining app for quite some time now. Opening the app can lead to long loading times on older devices, RAM consumption is high compared with most other apps and scrolling through your news feed chews up a lot of data.There is also the issue of battery life. Powering such a resource-intensive app requires a fair chunk of power, so you’re likely to see a tangible difference in how long your phone lasts on a single charge with and without Facebook installed.
Facebook is an essential app for many Android users, so the tax on system and battery performance might be a compromise that many of you are willing to make. But for other Facebookers, this might be more compromise than they want.
2. Facebook mobile is great
But there’s an alternative. You could uninstall – yes, uninstall – the Facebook mobile app. That would cut out most of the compromise. What does a Facebook user do when they don’t have the app?Use Facebook mobile. In other words, Facebook in Google Chrome. There are some neat things about it. Firstly, on signing into Facebook, Chrome will ask if you want to receive push notifications directly from Facebook. If you opt-in to this, you’ll be kept updated even when you aren’t using the browser.
The design of Facebook mobile is also pretty slick. It loads at similar speeds to the app, the design is similar as well, plus videos don’t autoplay (if this is something you aren’t a fan of).
But bear in mind that some features are missing if you use Facebook in a browser. This includes Instant Articles and auto-liking posts right from the notification shade. For that, you’ll need to keep the app.
3. Phone performance will improve
I deleted the Facebook for Android app a while ago and haven’t regretted it. I’ve used Facebook in Chrome ever since and, during my testing, phone performance and battery life improved noticeably. I also lived without notifications for a time and, I have to say, it was quite nice to have a break from all the buzzing my phone used to do.My usual daily driver is a Moto X (2nd Gen) and this phone has a relatively small battery. If your phone has a small or old battery, then you might see immediate results after uninstalling Facebook.
And hey, you could always reinstall again if you miss it.
Would you try living life without the Facebook app? If you have, did it make a difference to performance? Tell us about it in the comments.
If you have any queries do comment below we will try to help you.
Saturday, 30 January 2016
Contacts are being deleted automatically
This is simply a myth, contacts can't be deleted automatically. Here is a Solution what you need to check when you are facing this kind of problem.
Solution :
If it solved your problem then please like our Facebook page
Solution :
- While saving contact check the location where you are saving the contacts. If you saving directly to google then you might be facing this kind of problem. To save contacts directly to Google you need Internet access all the time which is not possible for everyone. So need to change location of storage to Device or Sim. You wont face this problem after that.
Why?
The reason why your contacts are being deleted automatically is whenevet you are saving contacts to Google and your interney is not ON it will show the contact is saved but in actual its not. To access Google you need Internet so its not right to save contact directly to Google. When you save contact to google it needs to sync your gmail account so if internet is on and you save contact then you may see the saved contact afterwards but if internet is not on then you wont be able to see that contact again.
If you have any queries do comment below we will try to help you.
Tuesday, 12 January 2016
Root Phone
Your phone is rooted or how to root phone what does that mean?
Here are all your answers.
Root Phone means you are the Admin of your phone. Android is open source which is based on
Linux operating system which is too Open Source. So you can modify the operating system (Android) but to do that you need to Root your phone.
Procedure to Root phone :

If it solved your problem then please like our Facebook page
Here are all your answers.
Root Phone means you are the Admin of your phone. Android is open source which is based on
Linux operating system which is too Open Source. So you can modify the operating system (Android) but to do that you need to Root your phone.
Procedure to Root phone :
- Download and install Kingo Android Root.
- Enable USB debugging mode on your phone.
- Run Android Root on your PC, then connect your phone via its USB sync cable.
- Click Root, then sit back and wait while the utility does its thing.
You can download this link from this link or click on above picture.
If you have any queries do comment below we will try to help you.
Missing Mute, Add Call option
Sometimes when you are calling you are not able to view mute option and Add call option, because of that you cant do call conferencing.
This issue can be resolved very easily.

Go to settings - > modes - select standard mode
this issue occurs if you have selected easy mode in your phone and in easy mode so many of the options are not displayed also your phone's font will be larger.

If it solved your problem then please like our Facebook page
This issue can be resolved very easily.

Solution :
this issue occurs if you have selected easy mode in your phone and in easy mode so many of the options are not displayed also your phone's font will be larger.

If you have any queries do comment below we will try to help you.
Subscribe to:
Posts (Atom)
-
This error generally occurs (com.android.keyguard has stopped working) when you turn on your phone and due to this your mobile starts hangi...
-
 There are four methods to resolve this issue. these are :- Method 1: Go to settings. Locate and enter the ‘Apps’ section or the ...
 -
The RPC error or RPC:S-5:AEC-0 error is a common error in Google Play Store affecting Android OSs like 4.2 Jellybean or 4.4 KitKat and 5.0...